If you are already familiar with database joins & just want to learn how to join tables in Dittofi, skip to the section “how to create table joins inside Dittofi”.
What database joins actually are
Well, to understand this, let’s start by looking at the following example of a database for a traditional ecommerce app, kind of like ebay, where users can list products & sell them.
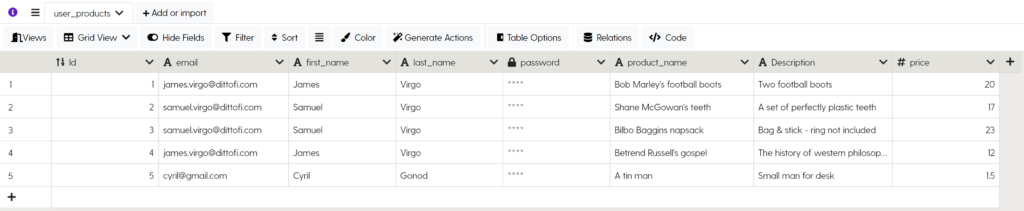
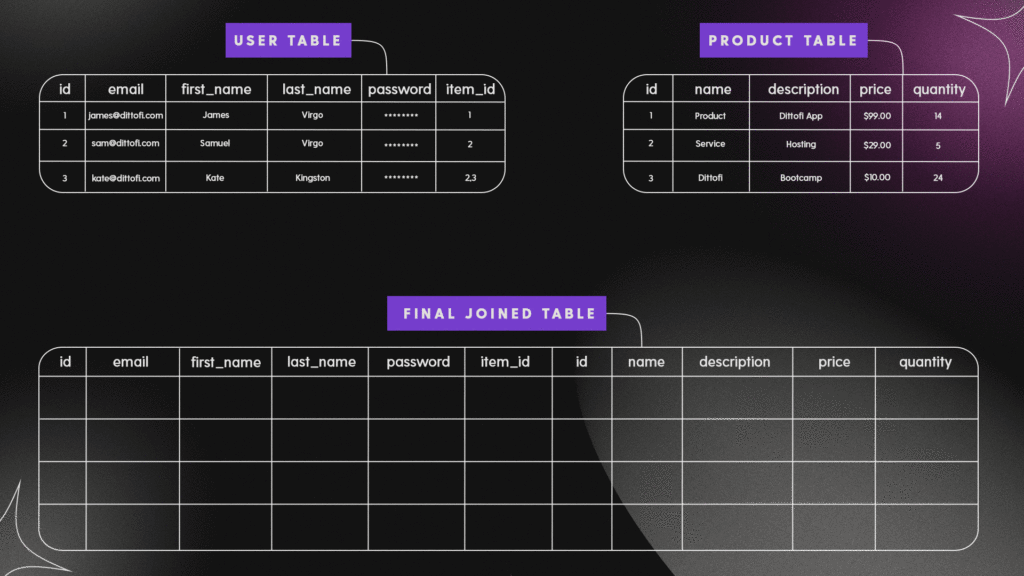
Let’s say that we have one big table in our database that stores all of our ecommerce apps users & products. Let’s call this table the “user_product” table. The data in our user_product table might look like the table below.
Image: user_product table example
As you can see, each user in this table has multiple items & so we need to repeat the user information multiple times throughout the table. This is so that we can know which user listed which item. For example, the user James Virgo owns both Bob Marley’s football boots & Betrend Russell’s gospel.
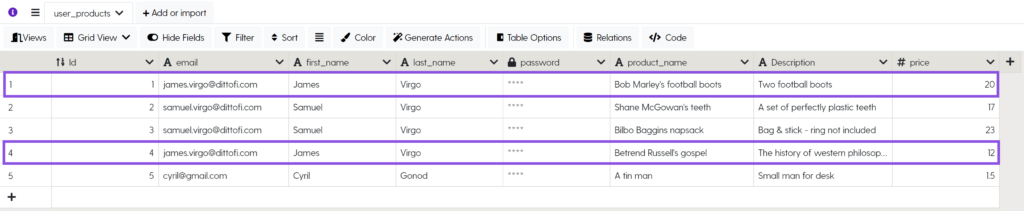
Image: user_products table highlighting the user james
Let’s suppose that one day, a user contacts us & says that they want to update their email. We now need to go through the entire table, looking for all of the times where the user’s information is displayed. We then need to edit the email for this user one row at a time. This process is shown below, switching the dittofi.com email for a gmail.com.
The example above shows that the process of updating fields can involve having to update multiple records in our user_product table. Having to update multiple records in this way is incredibly time consuming & is also very error prone. You could mistakenly type in the incorrect email address at any point.
Just as with doing this process manually, doing it with a computer also adds unnecessary processing time. This can make your application slow, will increase the risk of making an error in your data, lowering the reliability of your data & creates a bloated database. With computers this problem tends to creep in over time, and is one of the primary reasons why your app will slow down.
As a rule of thumb whenever you see data repeated inside of your database, you can know that you’ve probably done something wrong.
Dittofi Development Tip
The solution to the problem of repeating data, is to create multiple tables in the database & to then join these tables together. We will have one table called “Users” which is for our app users & one called “Products” which is for each of the users product items. The “Users” table will store all of the user information. As shown below.
Image: Users table
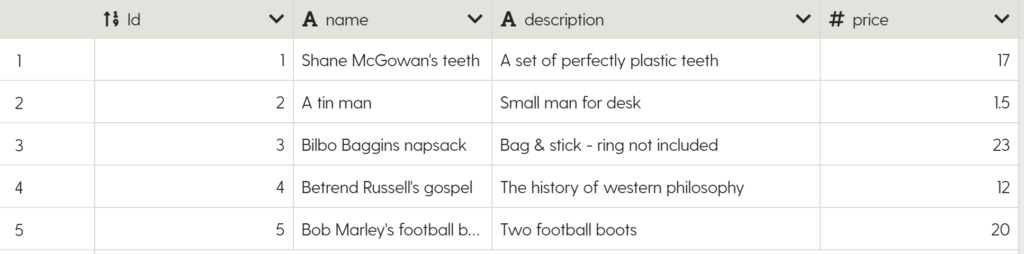
The “Products” table will be used to store all of the items that are being listed. As shown below.
Image: Products table
However, at this point we have a table of users & a table of products, but we have no idea which product belongs to which user. For example, the item “Bob Marley’s football boots” could be owned by any of our users. So how can we know which user has uploaded which item?
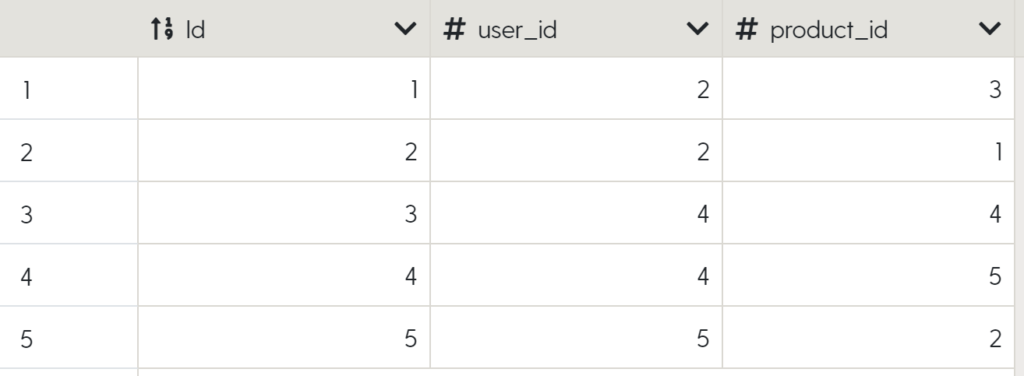
Well – the answer to this question is that we can use database joins. We can create a new table called user_products table. This will be a table that stores a reference to both the users & the products table, as shown below.
Image: user_product table
We can then look at the “user_id” & product_id fields in the user_products table & use these value to reference the user in the Users table & the product that they own Products table.
For example, take a look at the values where the user_id is 2. You can see that this is connected to a user in the Users table with the ID 2. This user is Samuel Virgo. Next look at the product_id’s for the user_id 2, these are the values 3 & 1. This means that the user Samuel Virgo is the owner of the products with id’s 3 & 1 or Shane McGowan’s teeth & Bilblo Baggin’s napsack.
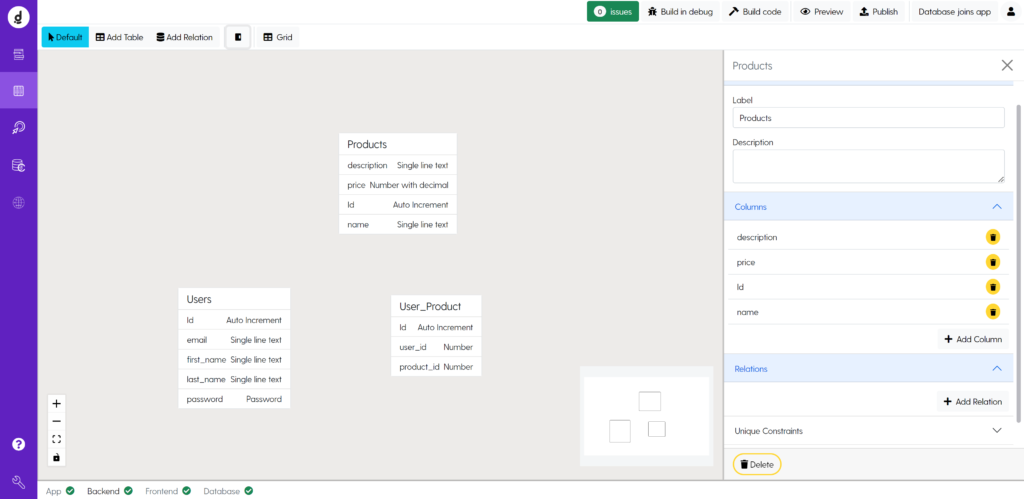
In traditional programming, developers will map out these kind of relationship using an ERD (Entity Relationship Diagram). You can see an example of an ERD inside Dittofi below.
Image: Table relationships on an ERD (Entity Relationship Diagram) in Dittofi
In traditional coding the boxes in the ERD are called entities & the lines that connect the boxes together are the relationships & this type of relationship is known as a many-to-many relationship, since many users own many products.
So – now we have removed all duplicate user data, we can just update the user information once. So database operations are now going to be faster, but as you can see, this is also a more compact way of storing data.
Okay – so storing data this way is great, but what happens when we want to pull all of the user data out of our tables & say display the users next to the items that they own? Well, in this case, the database technology will create a temporary table that will stitch together all of the data as shown below.
Image: Example of how Database Joins Work
Now know what database joins are. Let’s take a look at how to create table joins (otherwise known as table relations) using Dittofi.
How to create table joins inside Dittofi
Unlike traditional no-code tools, Dittofi gives you all of the tools that you need to build professional databases – without writing any code. For this reason, we give you two views of your database & tables. There is the traditional Grid View, where you can see all of your data as though it is inside of a spreadsheet. Data can be edited in this view by double clicking on a cell & then updating the values inside of the cells.
Dittofi also gives you the option to view your data in an ERD or Relations view, where you can see all of your tables represented as entities, as shown below.
Image: screenshot of entity relationship diagram
You can create table joins (or relationship) either from the Grid view or the Relations view.
Creating table relations from Dittofi’s relations view
From inside of the relationship view, you are able to create relationships between entities by (1) clicking “Add Relations”, (2) selecting the property in your entity that you want to create the join on e.g. item_id & (3) using the mouse to draw the relationship on the ERD as shown below.
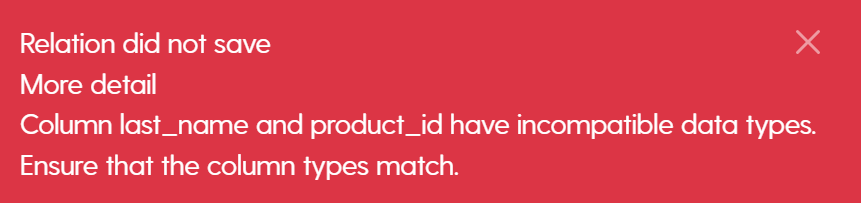
You can only connect up properties that have the same “Type”. For example, you can only connect up two number fields. You cannot connect a number field with a text field, because this would not make any sense. To help you here, Dittofi will alert you with the following error message if you try & connect up fields with incompatible data types
Image: Incompatible data type error message when attempting to create table relation
From the relations view you can return to the GridView by clicking on the GridView button & then add the item_id references by clicking on the cell in the users table & adding in the item_id, which references the “id” in the items table.
Creating table relations from Dittofi’s grid view
To create table relations from the Grid view, go to the Grid view & click “Table Options”. This will expand options related to your table. From here, you can click (1) the Relations button, (2) Add Relations & (3) choose which field in your table will be your primary & which will be your foreign key.
The primary key is a field that uniquely identifies a row in the table that you’ve selected. The foreign key is the reference to the primary key in the table that you’re connecting to. A great resource to understand the difference between primary & foreign keys is Eddie Woos video on primary & foreign keys.
The video below shows how to create relations from the grid view using the Table Options. You can also use the Table Options on the relations view to delete relations between tables.